Open top menu
#htmlcaption1 SEA DICAT POSIDONIUM EX GRAECE URBANITAS SED INTEGER CONVALLIS LOREM IN ODIO POSUERE RHONCUS DONEC Stay Connected
Tuesday, December 2, 2014
no image

Most knitters in the U.S. use the English style of knitting, as opposed to the Continental style. To knit in the English style, hold the yarn in your right hand, and hold the knitting needle with the cast-on stitches in your left (with the tip pointing to the right). The first stitch should be no more than 1 inch from the tip of the needle.

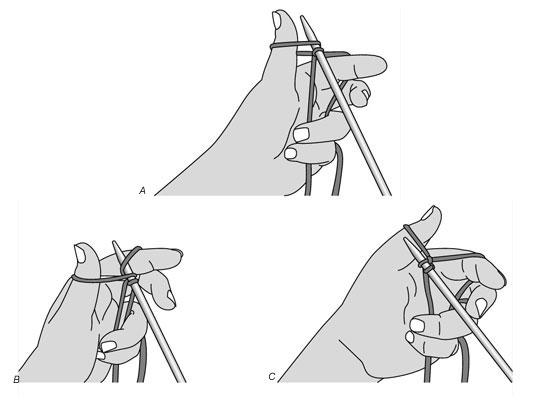
1. Insert the tip of the empty (RH) needle into the first stitch on the LH needle from left to right and front to back, forming a T with the tips of the needles.

The RH needle will be behind the LH needle.


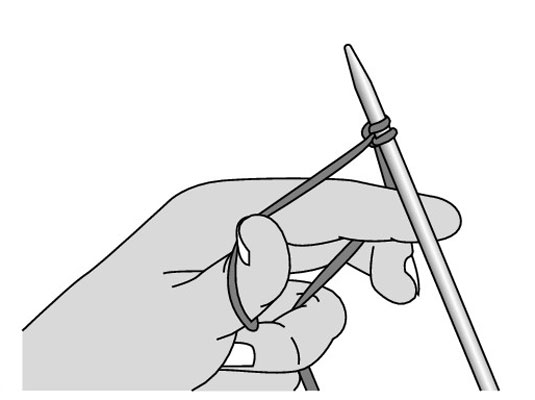
2.With your right hand, bring the yarn to the front from the left side of the RH needle, and then over the RH needle to the right and down between the needles.

You can try to maneuver the yarn with your right forefinger, as shown in this figure, or just hold it between your thumb and forefinger for now.


3.Keeping a slight tension on the wrapped yarn, bring the tip of the RH needle with its wrap of yarn through the loop on the LH needle to the front.

The RH needle is now in front of the LH needle. Keep the tip of the left forefinger on the point of the RH needle to help guide the needle through the old stitch and prevent losing the wrap of yarn.


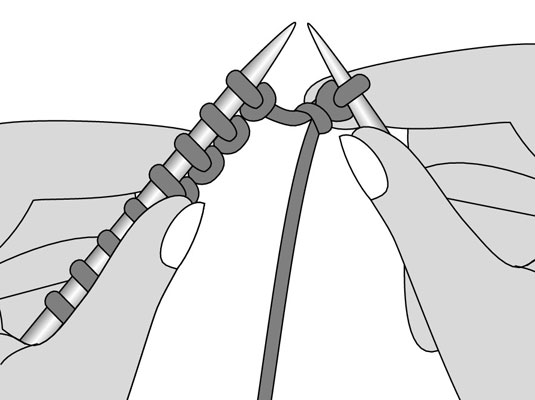
4.Slide the RH needle to the right until the old loop on the LH needle drops off.

You now have a new stitch/loop on the RH needle — the old stitch hangs below it. Congratulations! You’ve just made your first knitted stitch!

5.Repeat steps 1 though 4 until you’ve knitted all the stitches from your LH needle.

Your LH needle is now empty, and your RH needle is full of beautiful, new stitches.


6.Turn your work (that is, switch hands so that the needle with stitches is in your left hand) and knit the new row.

When you turn your work, the yarn strand coming out of the first stitch to knit is hanging down in the front.
The stitch just below the first stitch (big loop) on your LH needle is larger than the rest and can obscure your view of where your needle should go. To better see the opening of the first stitch, keep the strand in front and gently pull down on it, and the big loop if necessary. Be sure to insert the point of the RH needle into the loop on the LH needle and not into the stitch below.


7. Repeat these steps for several more rows (or all afternoon) until you’re comfortable with the movements.

Aim to make these steps one continuous movement, to make even stitches, and to stay relaxed!
Whichever knitting method you use, English- or Continental-style, you'll get the same results. The important goals are to use the method that's most comfortable for you and that the stitches look even.
Read more
no image

When you cast on with the two-strand method in knitting, you need only the RH needle. The two-strand cast-on method (or long-tail method) is a great all-around cast-on for your knitting repertoire. This cast-on method is elastic, attractive, and easy to knit from.


1.Measure off enough yarn for the bottom part of your piece and make a slip knot on your needle.

To make the slip knot (the first stitch), make a pretzel-shaped loop and place your needle into the loop (a.) and pull gently on both ends of the yarn until the stitch is firmly on the needle (b.) but still slides easily back and forth.
To figure how long the “tail” should be, you need approximately 1 inch for every stitch you cast on, plus a little extra. Alternatively, you can measure the bottom of the knitted piece and multiply this number by 4.

2.Holding the needle in your right hand with the tip pointing away from your hand, insert your left thumb and index finger into the “tent” formed by the two yarn ends falling from the slip knot on your needle.

This position might seem a bit awkward, but it’ll be second nature when you become a knitting know-it-all!


3.With your left hand’s ring and pinkie fingers, catch the yarn ends and hold them to your palm.

This step prevents the ends from flapping around as you work.

4.With your right hand, pull the needle between your left thumb and index finger.

You don't want the “tent” sides to be droopy.


5.With the needle tip, go around the yarn on your thumb from the left, as shown in (a), then go around the yarn on your index finger from the right (b), and pull the new loop through (c).

This looks complicated, but you’ll get the hang of it.

6.Tighten this new loop (your first cast-on stitch!) onto the needle — but not too tight.

If you don’t let go of the yarn after creating the stitch, you can use your thumb to tighten the stitch onto your needle.
Although this is your first cast-on stitch, it’s technically the second stitch on the RH needle; the initial slip knot counts as the first real stitch.

7.Repeat Steps 5 and 6 until you have the number of stitches you need.

If you need to put your work down, or if you lose your place, you may have to pull the stitches off the needle and start from Step 2 again.
Read more
no image

Yarn is packaged (or put up) in different forms: balls, skeins (rhymes with canes), and hanks. The differences in yarn packaging shouldn't have much effect on the yarn you choose, but the shape does determine how you work with them.
  • Ball: Yarn that's . . . well, wrapped into a ball shape.
  • Skein: Yarn wrapped in a loose twist. Yarn packaged as balls and skeins come ready to knit. After you find the end, you can cast on and go.
  • Hank: Yarn wound into a large circle and then folded. You need to wind hanks into a ball before you can use them. If you try to knit with the yarn in hank form, you’ll quickly end up with a tangled mess.
    Your local yarn store may offer a winding service to convert hanks of yarn to balls by using a yarn (or ball) winder and a swift — two pieces of equipment that allow you to make an easy-to-use “cake” of yarn that sits flat while you knit it. If you find yourself with many hanks to wind, you can even buy your own winder and swift!
    image0.jpg
Knit or crochet with the yarn end that comes from the inside of the skein or ball. This way, the skein or ball will remain in place as you knit and not roll around the floor. If you’re lucky, the yarn already will be center-pulled — the inside end will be pulled to the outside — easily identifiable and ready to go. If not, you have to reach in and pull out a small hunk of yarn in order to find this end and then rewrap the extra.
Read more
no image

In knitting, written stitch patterns include punctuation such as commas, asterisks, and brackets (or parentheses). The punctuation in knitting instructions mean more than you may think, however.
Here’s a punctuation translation for written stitch patterns:
  • Commas (,) separate single steps. The instruction “Sl 1 wyif, k5” tells you to slip a stitch with the yarn on the front side of the work, and then to knit 5 stitches as normal (meaning you have to move the yarn to the back before knitting, even though the instructions don’t tell you to).
  • An asterisk (*) indicates that whatever follows gets repeated (rep). For example, the instruction “K1, * sl 1, k3; rep from * to last st, k1” means that you knit 1 stitch, then you work the stitches between the asterisks (slip 1 stitch and knit 3 stitches) over and over until you reach the last stitch of the row, which you knit.
  • Brackets [ ] or parentheses ( ) function much like the asterisks, except that you’re repeating a series of stitches a specified number of times. For example, the instruction “* K5, (p1, k1) twice, p1; repeat from * to end of row” means that, after you knit 5, you purl 1/knit 1 two times, followed by another purl 1, and then you repeat this entire sequence across the entire row.
Written instructions give you row-by-row directions for a single repeat (rep). Here’s an example of a stitch pattern in written form:
Row 1 (RS): * K2, p2; rep from * to end of row.
Row 2 (WS): * P2, k2; rep from * to end of row.
Translation: On the first row (the right side is facing you on the first row in this pattern), you knit 2 stitches, purl 2 stitches, knit 2 stitches, purl 2 stitches, and so on to the end of the row. On the next row (wrong side facing now), you begin by purling 2 stitches, then knitting 2 stitches, purling 2 stitches, knitting 2 stitches, and so on to the end of the row.
Read more
no image

Knowing how to read knitting abbreviations and shorthand becomes easier the more you work with knitting patterns. Common knitting abbreviations and shorthand include RS (right side), WS (wrong side), beg (beginning), and rep (repeat). Pattern instructions explain any unusual abbreviations or ones that may vary from pattern to pattern.
This table shows some of the most common pattern abbreviations.
Common Knitting Abbreviations
Abbreviation What It Means Abbreviation What It Means
beg beginning pwise purlwise (as if to purl)
CC contrasting color rem remain(s) or remaining
ch chain rep repeat
cn cable needle RH right-hand
dec decrease(s), decreased, or decreasing RS right side(s)
dpns double-pointed needles rnd(s) round(s)
foll follows or following sc single crochet
inc increase(s), increased, or increasing sl slip, slipped, or slipping
k knit sl st slip stitch
k2tog knit 2 stitches together ssk slip, slip, knit the slipped stitches together
k-b knit in stitch below St st stockinette stitch
kwise knitwise (as if to knit) st(s) stitch(es)
LH left-hand tbl through the back of the loop
lp(s) loop(s) tog together
MC main color WS wrong side(s)
m1 (or m) make 1 stitch (increase 1 stitch) wyib with yarn in back
p purl wyif with yarn in front
pat(s) pattern(s) yb yarn back
p-b purl in stitch below yf yarn forward
pm place marker yo yarn over
psso pass slipped stitch over (used for decreasing)
Read more